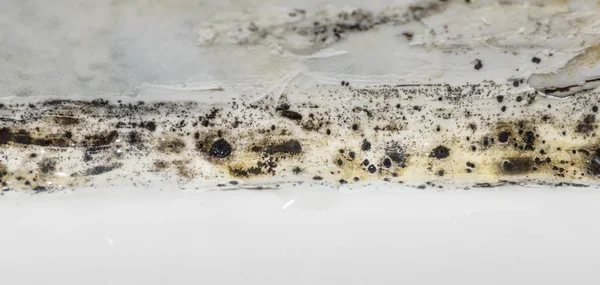
Mold growth under the kitchen sink is not only unsightly, but it can also pose serious health risks if left unaddressed. Mold releases spores into the air which, when inhaled, can cause allergic reactions, respiratory issues, and even fungal infections.
Apart from the health risks, not addressing mold under the kitchen sink can lead to further damage. Mold thrives in damp environments, and the kitchen sink provides an ideal breeding ground due to constant exposure to water and potential leaks. Cleaning and removing mold will not only improve the air quality in your kitchen but also prevent structural damage and the potential further spread of mold to other areas.
What Are the Health Risks Associated with Mold?
It is important to note the health risks associated with mold. Mold can produce allergens, irritants, and in some cases, toxic substances known as mycotoxins, which can have detrimental effects on human health. These mycotoxins can cause symptoms such as headaches, dizziness, fatigue, and even neurological problems.
To protect yourself and your family from the health risks associated with mold, it is crucial to address any mold growth promptly and effectively. Regularly inspecting and cleaning areas prone to moisture, like under the kitchen sink, can help prevent mold growth.
How to Clean Mold Under the Kitchen Sink
Put on your protective gear and get ready to scrub away the stubborn mold, rinse thoroughly, and apply a mold inhibitor for long-lasting results. Say goodbye to mold and hello to a clean and healthy kitchen!
Clear the Area
- Begin by gathering the required supplies to successfully eliminate mold under the kitchen sink: gloves, a mask, garbage bags, a scrub brush, and a cleaning solution.
- Take out all the items that are stored under the sink, including cleaning supplies, pipes, and containers. These belongings should be placed in a separate area for cleaning purposes.
- Thoroughly clear the area by using a damp cloth to wipe away any debris or mold spores.
Identify and Address the Source of Moisture
- Inspect the area under the kitchen sink for any visible signs of water leakage or dampness.
- Check the pipes and plumbing connections for any potential leaks. Look for water stains or drips.
- If you find any leaks or water damage, repair or replace the affected pipes or connections.
- Consider using pipe insulation to protect pipes from condensation and prevent moisture buildup.
- Address any sources of excess humidity or moisture in the kitchen, such as a faulty ventilation system or lack of proper airflow.
You can also find mold on your pebble shower floor. We have a blog on how to clean pebble shower floors. This is a huge problem when mold gets into areas that are meant to be incredibly clean similar to yours it is best to learn how to clean mold off tile grout before it gets too bad and starts to impact your health.
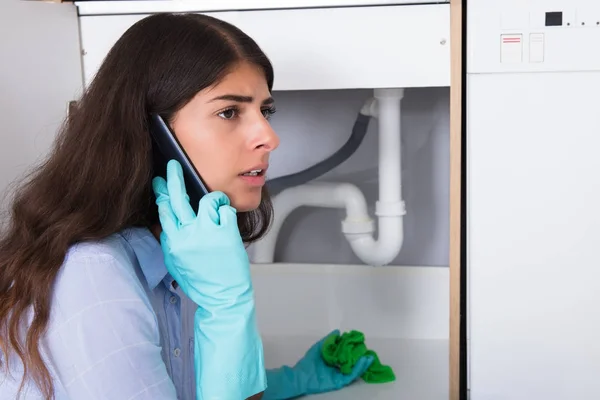
Wear Protective Gear
Protective gear is crucial when cleaning mold under the kitchen sink as it helps minimize exposure to potentially harmful mold spores. By wearing rubber gloves, safety goggles, a face mask or respirator, long-sleeved clothing, and shoe covers, you can protect yourself from skin contact, inhalation, and cross-contamination. These precautions help reduce the health risks associated with mold exposure and ensure a safe cleaning process.
Scrub and Rinse the Affected Area
- Use a scrub brush or sponge soaked in a mixture of water and detergent to scrub the mold off the surfaces. Apply firm pressure and scrub in circular motions to ensure thorough cleaning.
- After scrubbing, rinse the area with clean water to remove any remaining detergent and mold particles.
- Use a clean towel or cloth to dry the surfaces completely. Ensure there is no moisture left, as it can encourage mold regrowth.
Dry the Area
- Set up fans or dehumidifiers near the area to help dry out any remaining moisture. Aim the airflow directly at the damp area.
- If possible, use a space heater to provide additional warmth, as heat can speed up the drying process.
To enhance the drying process, consider placing moisture-absorbing products like silica gel packets or activated charcoal near the area. These products can help to absorb excess moisture and prevent mold growth.
Apply Mold Inhibitor
Prepare the area: Ensure that the affected area is clean and dry before applying the mold inhibitor.
Choose the right product: Select a mold inhibitor that is specifically designed for use in kitchens and is effective against the type of mold present.
Read the instructions: Carefully read the instructions provided by the manufacturer to understand how to correctly apply the mold inhibitor.
Wear protective gear: Put on gloves and a mask to protect yourself from any potential exposure to the mold inhibitor.
Apply the inhibitor: Using a clean cloth or sponge, apply the mold inhibitor directly to the affected surfaces. Make sure to cover all visible mold areas, including corners and crevices.
Allow it to dry: Leave the mold inhibitor to dry completely. Follow the manufacturer’s instructions for the recommended drying time.
Recheck for mold growth: Once the mold inhibitor has dried, inspect the area for any remaining signs of mold. If necessary, repeat the cleaning and mold inhibitor application process.
Apply Mold Inhibitor: As an additional step, apply the mold inhibitor once again to ensure complete protection against mold growth.
Dispose of Contaminated Materials
- Place the contaminated materials in a plastic bag, making sure to seal it tightly to prevent any mold spores from escaping.
- If there are any porous materials, such as wooden items or cardboard, that are heavily contaminated and cannot be salvaged, dispose of them separately in a sealed plastic bag.
- Check with your local waste management guidelines to determine the proper way to dispose of the plastic bag containing the contaminated materials. They may need to be labeled as hazardous waste or taken to a specific facility for disposal.
- Thoroughly clean and sanitize any non-porous items that came into contact with the mold, using a mixture of water and bleach or a commercial mold cleaner.
- Dispose of the gloves and mask properly, following the guidelines for your specific area.
- Wash your hands thoroughly with soap and water.

Determining when to enlist the services of an expert cleaning company is pivotal for maintaining a clean and healthy environment. Whether it’s your home, office, or commercial space, signs such as persistent stains, odors, or overwhelming clutter should prompt you to seek professional assistance. Moreover, scheduling routine professional cleanings can prevent the accumulation of hidden contaminants, allergens, and germs, promoting overall well-being.
Don’t wait until the dirt and grime become unmanageable. Take action today! Contact us at Ivy Cleans, a trusted cleaning company to restore the cleanliness and freshness of your space. Your peace of mind and the health of your surroundings depend on it. Don’t hesitate, call now for a cleaner tomorrow.
If you’re looking for more content like this we have a blog on how to clean mold off your couch.
